Monday, April 4, 2016

Hot Air Balloons!

     This was a fun project to do with my 4th Graders incorporating 2-D & 3-D art along with portraits.  To begin the lesson, we reviewed what we know about the difference between 2-D and 3-D art and compared and contrasted the two. Next, I gave the students white tempera paint to paint their clouds on their blue paper.  While that was drying, students drew the basket and worked on making their balloons.  I demonstrated how to fold a small section of the paper strip at the end for gluing purposes and how to bend it to make an arc and glue the other side.  Make sure to add lots and lots of paper strips so the balloons look full with no empty space showing.  Last, the students drew a small portrait of themselves in the basket.  I saved this step for the very end because even if they ran out of time for their person, their artwork would still look complete.  I also know that if we would have drawn the person first, they would not have had time to finish their project.  


Wednesday, March 9, 2016

1 Fish 2 Fish

Words cannot express my love for Dr. Seuss and his imaginative books and illustrations! In the art room, using his books is the perfect way to connect art and literature! I did this project with my Kindergarteners last week in honor of Dr. Seuss's birthday. We read the book 1 Fish 2 Fish Red Fish Blue Fish together and came up with all kinds of rhyming words of our very own!

To begin the art project, students were given a white 12x18" paper and painted their stripes across from the left to the right. While that was drying, we drew our fish on each color of 6x9" paper and cut them out. Lastly, we glued the fish on the striped paper and displayed them next to our library! 


Monday, February 8, 2016

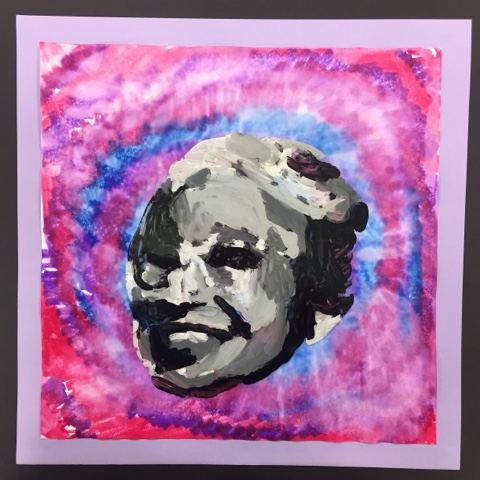
Black History Month Value Portraits

For Black History Month, I wanted to do a portrait drawing lesson showing value scale.  Last week, the students were given one of 6 famous African Americans and read a short biography about their person.  To begin the lesson, we made value scales and practiced shading with pencil.  Next, students practiced drawing their person's portrait on a scrap piece of paper.  My main goal was for students to draw their person on their tie-dye paper (which we made in a previous class) and use sharpies and pencils to add the value.  However, I could see that this particular skill was far too advanced for 5th and 6th graders.  I quickly realized that drawing value portraits was too abstract of a concept for my students because they were instructed to look for the shapes that the highlights and shadows made on their faces.  Most students got so discouraged that they stopped drawing altogether.  I had a week to devise another plan before I totally scrapped this project.  So, I came up with the idea of drawing on transparencies and painting the shapes the shadows and highlights made by tracing them right on the transparencies.  I feel this was the perfect accommodation for my students in learning about value scales and realistic portrait drawings.  In the future, I will start with this technique and develop another lesson to follow this one where students can create a grid drawing and paint the value scales on their own.  We will be displaying these striking portrait paintings at our annual Black History Program!


Booker T. Washington by Adreana 


Bessie Coleman by Amani


Frederick Douglas by Jayven


Jackie Robinson by Antoine 


Rosa Parks by Faith 


Dr. Martin Luther King Jr.  by Sidney


Wednesday, December 9, 2015

Mittens!

This is a great art project to go along with the Ukrainian folktale, The Mitten by Jan Brett.  We read the story together and discussed why the story is considered a folktale and what happened in the story that is unrealistic.  Students were give blue paper and white colored pencils to fill their paper with snowflakes of different sizes and varieties.  Next, students traced their hands in the shape of a mitten and added lines, shapes, and colors.  Lastly, for some fun detail we added a yarn string and a giant die-cut snowflake and some glitter!


Winter Villages

This is a great seasonal art lesson, perfect for grades K-3. To begin, we read the book The Snowy Day by Ezra Jack Keats and we discussed some of the similarities between the character's snow day and our snow days.  Next, students wrote about their favorite thing to do on a snow day.  We used gray paper for this project because the long winter days in the Mid West are filled with mostly gray skies.  To begin, I demonstrated drawing houses using basic shapes.  We colored the houses with regular Crayola crayons and used a lot of pressure while coloring so the colors would look as bright as possible on the dark paper.  Next, we tore white paper to create the texture of fluffy snow.  The torn paper was glued under the houses and between the houses to create depth.  Lastly, we used white paint add snow on the top of the houses, trees, chimneys, and in the sky!  The students did a great job on this project, and it looks even better with iridescent glitter sprinkled on the top!


Tuesday, November 3, 2015

Art + Language Arts

This is a great lesson to do with 1st graders! Pick a story and have them sequence it illustrate it! We divided our papers into four sections, labeled them 1, 2, 3, 4, and drew what happened 1st, 2nd, and so on. This was a great story about kindness and treating people with respect, even if they're different than you. 


Wednesday, October 7, 2015

Positive Negative Insects


This is a great project for 5th graders and above.  All of my 5th and 6th graders did this project!  First, you want to start by drawing half of a spider or an insect on one side of a 9" square.  Cut out the insect perfectly, leaving the negative space in the paper.  Next, trace the shape you cut-out on all 3 other sides of the square.  Cut out all of the insects/spiders.  Draw a shape into the body and cut that out, as well.  Next, glue the 9" square like a diamond on the 12x12" background paper.  Flip the shape of the insect onto the background paper, leaving a symmetrical 2-colored bug.  Make sure to enforce using very minimal amounts of glue.  Too much glue will wrinkle the paper and make it look sloppy and messy.  Good Luck!

Thursday, September 3, 2015

Kindergarten Communities

This month in Kindergarten, the classes are talking about communities and learning how we all work together for a specific purpose. So....in Art Class, we created a class community mural! I showed the kids a slideshow that I created with different parts of a community: libraries, hospitals, restaurants, stores, police stations, and so on. Students picked which type of building they would like to make and added details to their buildings to make them specific.  They also wrote out the signs for the building they chose.  When they were finished, I glued them into the mural paper and let the students add details to the paper with markers. They really enjoyed this project and it'll look FABULOUS in the kindergarten hallway! 


Wednesday, September 2, 2015

Kindergarten Cities

Want to keep your Kinders busy cutting, gluing, and creating??? Then this is a great project for you! I love to teach step-by-step projects to my youngest of students and the oldest of students...it helps them to stay focused when I am going brought the project with each individual step. For this project, I had 4x12" colored paper pre-cut. I showed the Kinders how to draw 3 half-circles on their paper and cut it out to make a bridge. Next, we traded our half-circles with our friends so we would all have different colored boats! Next, we cut out triangle sails and drew some water with oil pastels. Lastly, we created houses and buildings by cutting out squares and triangles and added stars and a moon into the sky with yellow oil pastel. 


Tuesday, August 25, 2015

3rd Grade Reflection Drawings

This has to be one of my all time favorite projects to teach! I sorta feel like a magician when I reveal the reflection pressed into the bottom half of the paper. The kids think it's so cool! To start, we talk about different types of art - landscapes, seascapes, cityscapes. Next, students share what types of big cities they have visited and some of the most famous features of those cities. I demonstrate how to draw different sizes and shapes of buildings on the upper half of the folded paper. The more color they add, the better the drawings will look! When the drawings are complete, they paint the bottom half of the paper with water and then fold the paper and reveal the reflection! You should try it with your students! You won't be disappointed!


Wednesday, August 19, 2015

Kinders Name Art

This is a GREAT first week of school art project for kinders!  It allows them to practice letter recognition while helping the teacher remember their names!!! It's a win-win!  I already had their names written on the black paper before they came to art class and set them at their individual spots so they know where their art seat is.  I also read the book "Too Much Glue" to the class before we began.  Let me tell you...I had 2 out of my 3 classes use gluesticks because the glue bottles weren't ready yet, and that was definitely the way to go!  Less mess and all around better works of art.  Lesson learned!


Friday, August 14, 2015

1st Grade Self-Portraits


Today in Art, which happens to be the second day of school, our first graders created these fun self-portraits!  I just love starting off the school year with self-portraits and a little bit of writing.  For this assignment, the students were to write one sentence about something they like to do.  Next, we all drew a step-by-step self-portrait and added the personal details to really make the portrait look like each student.  Before class, I printed out their names and they colored in the letters to add another element of fun!  I have a feeling these will be hanging in our hallway for a long time! 

Thursday, May 21, 2015

Fine Arts Fair


And that's a wrap. A great school year has come to an end and I had the privilege of showing off my students' exceptional talent. I did it a little bit differently this year. Instead of using the whole shook as a gallery, I combined all of the works of art to our foyer and main hallway at school. I also hung up the artwork randomly instead of grouping them by class. This was great! It looked like a real art gallery! Plus, the kids kept looking and looking at the art of their peers, not just their own. I set up a creation station where students painted melted records that I will place in the garden to resemble flowers. Here are the highlights of the evening: 


Our Picture The Music Award winners had their winning pieces on display. 


Brother and sister art winners! Shania won the school-wide t-shirt design contest while her little brother win an award for his Picture The Music art.