
Showing posts with label Sculpture. Show all posts
Showing posts with label Sculpture. Show all posts
Friday, April 26, 2013
3-D Paper Rainbows
Is this not THE MOST ADORABLE art project you have EVER seen? (Ok, I get a bit overly excited about rainbows, lol). This was a project I did with my Kinders yesterday. We sorted the paper strips, compared the sizes, ordered them from least to greatest, and used patterning. Whew! Let me say, it did take the entire hour of art class for these creations, but it was worth it! You start with an 18" red strip and decrease the size by 1.5" for each color until you end with the pink strip. Doing this, it causes the paper to bend into that fabulous arc. You should definitely give this project a try!

Tuesday, March 19, 2013
Dubuffet Sculptures
Today in Art, the 6th Graders learned about the abstract art of Jean Dubuffet. He is an interesting artist to study because kids can relate to his simple, graphic, bold artwork. I also emphasize that Dubuffet was inspired by the simplicity and immaturity of children's artwork (& the art of the criminally insane, but I leave that out of my introduction). I really love teaching this lesson because it gives students the chance to create a paper sculpture, use what they know about free-form shapes, and the end result is quite beautiful. Here are three great examples from my 6th grade class:


Carson's Sculpture

Celeste's Sculpture

Brea's Sculpture
Thursday, May 3, 2012
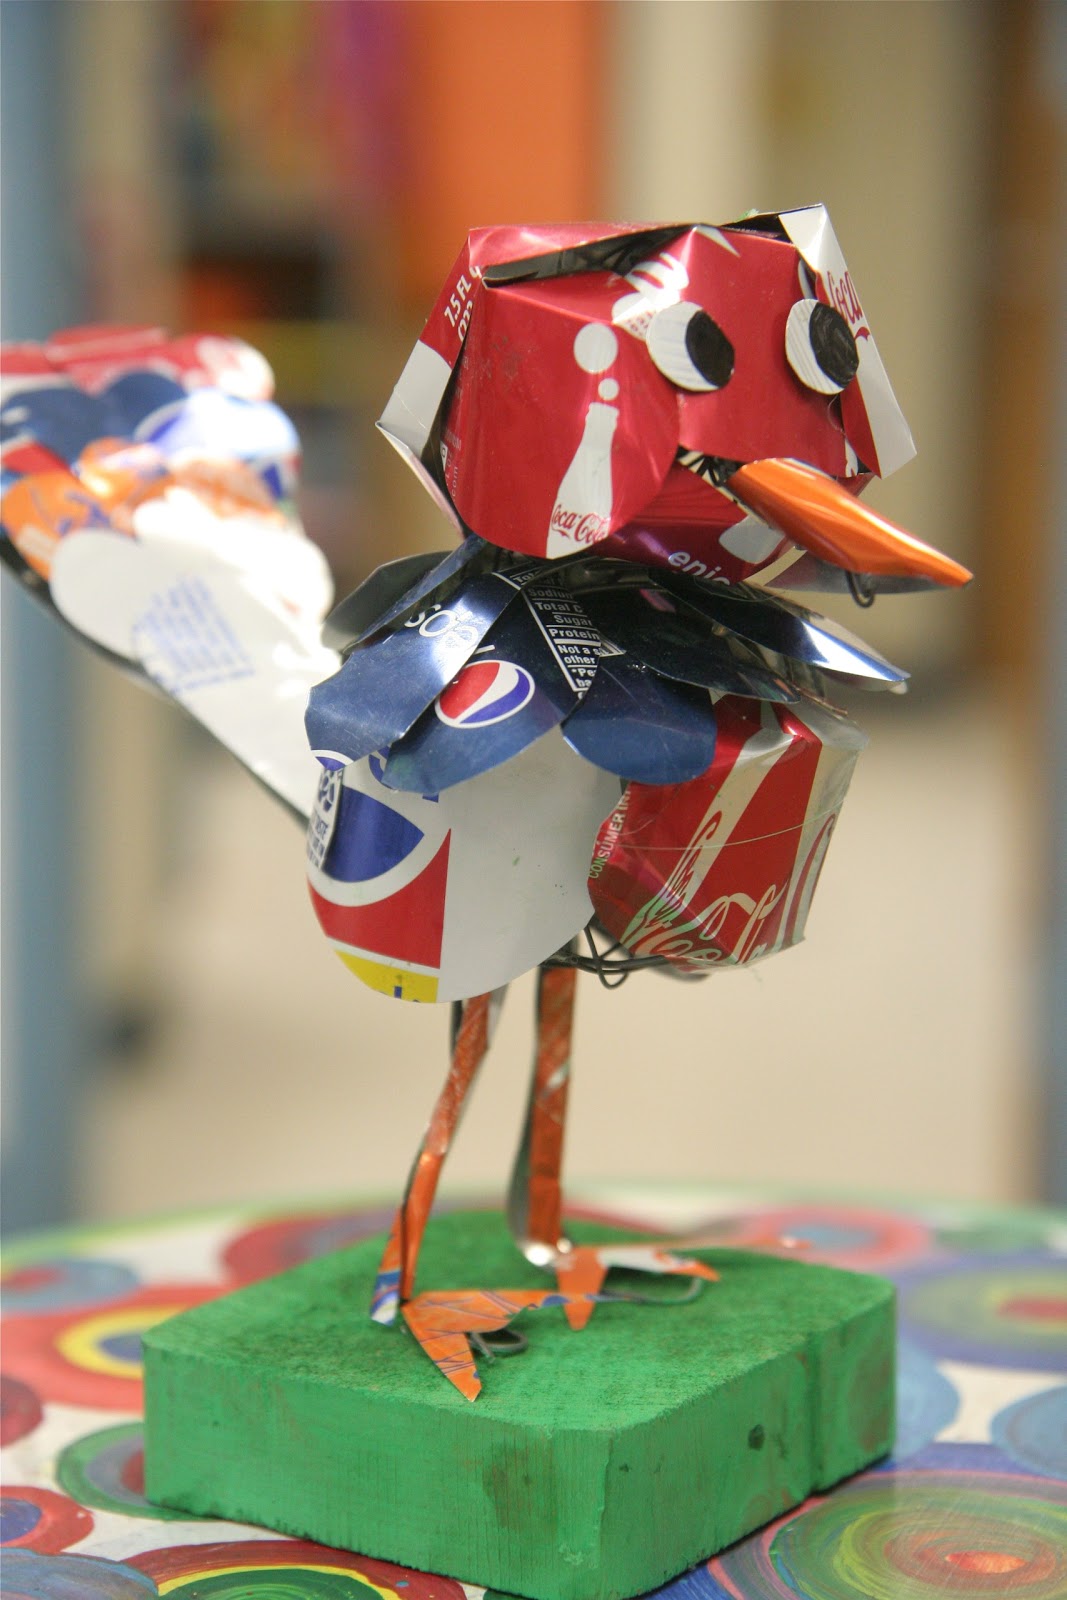
Wire Bird Sculptures
I found this lesson at Stuck in the Mud Pottery and really wanted to try it out with one of my classes. Here is a link to her original lesson: http://stuckinthemudpottery.blogspot.com/search?q=soda+can


I decided to tackle this project with my 5th grade students because they are a very creative group of kids. I think they did really well with the form for their birds so far. Basically, I told them to create a "yarn ball" with their wire; a large one for the body & a small one for the head. Next, I showed them how to attach the head to the body, add legs, a tail, and a beak by bending the wire. The legs attach best if you feed them through the body, having them actually attach to the top of the back. This seems to give it more strength. I have an endless supply of these cedar blocks, so I poked holes through the wood, added hot glue, and stuck the ends of the wire through the holes.
Next class period, I will have the students finish the birds by adding colorful soda can feathers. I had the aluminum pre-cut for the students so all they have to do is cut out some large tear-drop shapes for the feathers. I found that some of the aluminum can simply be bent into shape without the use of hot glue. However, most of the feathers and details will have to be added with a glue gun. I have 2 in my classroom and I do the majority of the gluing and I use a good amount of discretion before letting the students use the hot glue gun by themselves.
I will post pictures next week of some finished pieces (hopefully).
Here is my teacher sample:
And here are the wire bird sculptures before we had to chance to add the soda can feathers:

I decided to tackle this project with my 5th grade students because they are a very creative group of kids. I think they did really well with the form for their birds so far. Basically, I told them to create a "yarn ball" with their wire; a large one for the body & a small one for the head. Next, I showed them how to attach the head to the body, add legs, a tail, and a beak by bending the wire. The legs attach best if you feed them through the body, having them actually attach to the top of the back. This seems to give it more strength. I have an endless supply of these cedar blocks, so I poked holes through the wood, added hot glue, and stuck the ends of the wire through the holes.
Next class period, I will have the students finish the birds by adding colorful soda can feathers. I had the aluminum pre-cut for the students so all they have to do is cut out some large tear-drop shapes for the feathers. I found that some of the aluminum can simply be bent into shape without the use of hot glue. However, most of the feathers and details will have to be added with a glue gun. I have 2 in my classroom and I do the majority of the gluing and I use a good amount of discretion before letting the students use the hot glue gun by themselves.
I will post pictures next week of some finished pieces (hopefully).
Monday, April 30, 2012
Fine Arts Fair Prep
I have been neglecting my blog this past month because I am getting ready for our Fine Arts Fair in a couple of weeks, as I am sure you are too! Although, I hope you are less stressed about it than I am. For some reason, I have this innate desire to out-do myself every year. So, this year, I am having my students display one 2-D and one 3-D piece of art for the event. I also planned each and every class to have a separate 2-D and 3-D work of art so there are no classes with the same project. That's a grand total of 36 different lessons and 600 pieces of artwork that needs to be finished, presentable, and displayed by May 15th. Whew!! And of course I have left ALL 300 3-D sculptures for the month of April, that's what I do best...wait until the last minute. So, here are a sampling of the lessons we have been working on this past month.


4th Grade Origami Flowers

The 4th graders have created glue-line relief flower paintings in the style of Georgia O'Keefe, so I thought some flower sculptures would compliment the paintings nicely. I walked them through the step-by-step process of folding each flower petal and I hot-glued the petals together when they were complete. I also added a dowel rod for the stems and a wood block so the flowers could stand tall. I will also have the students paint the stems & base green and add some leaves next class period. I used a collection of buttons for the center of the flowers.
2nd Grade Ceramic Cloud Mobiles w/ birds

I want to give credit to the Etsy artist who inspired these cloud mobiles. You can find her work here: almapottery, http://www.etsy.com/listing/49331222/sale-price-adjusted-rain-cloud.
We started out with a slab of clay and I had my students roll the slab until they had even consistency. Next, they cut out the cloud shape and saved their scraps of clay to make the birds. They poked three holes in the bottom of the clay and one at the top for the strings. The next class period (after the clay has been fired), I helped them hot glue the beads along their strings and they painted the clouds and the birds. I had to spend a lot of my free-time attaching the birds to the strings and attaching a wire at the top of the clouds so they can hang. But, I think they turned out pretty well!

3rd Grade Stamped Ceramic Pendent Necklaces

This was a really fun project to do with 3rd graders! I showed them how to pinch off a small piece of clay, flatten it out into a round disk, and stamp the bottom of their shoe on the clay to get the texture. This was neat because everyone's shoes had different patterns on the bottom. Some even had the name brand stamped on like the one above. After they were fired, I had the students paint them using acrylics and I helped them hot glue the string to the pendent and attach the beads.
2nd Grade Q-Tip Colorful Dandelions

I was inspired by an Anthropologie photo that I saw on Pinterest using q-tips to make dandelions. Of course, I couldn't leave the q-tips white! All you need are enough styrofoam balls for each person and q-tips cut in half. I thought 1,000 q-tip halves would be enough for one class, but I definitely could have used more! Again, I used dowel rods and wood blocks. Maybe we'll make some leaves for these, too?
Monday, April 23, 2012
Cube Sculptures
3rd graders last week worked on folding paper cubes in Art Class. It took 2 weeks of folding cubes before students were ready to create something interesting out of them. I encouraged students to have a collection of 5 or more cubes to work with. Some students created alphabet letters, robots, rockets, and other objects. But this student created an adorable little building and attached it to a scrap paper, colored it, and added details. I thought she did a fantastic job!


Thursday, February 16, 2012
Dr. Seuss Week!
We are getting ready to have the Cat in the Hat visit our school. What better way to welcome him than an art display dedicated to Dr. Seuss himself? Here are three examples of projects that we have been working on:
3rd graders drew portraits of the Cat in the Hat -
 Another 3rd grade class made these fun fish paintings:
 And Lorax trees:

3rd graders drew portraits of the Cat in the Hat -


Friday, December 2, 2011
Paper Ornaments/Spheres

This is a lesson that I did with my 5th and 6th graders today. They were SOOOOO excited to begin the project because I had two spheres already made and they look very cool. But as we were working, they realized just how complicated these are to make. It takes some patience, but with a little bit of good direction, your students will be making these in no time. We made the large spheres but if you wanted to conserve paper and call them 'ornaments', then I suggest making the medium or small ones. All three templates are located on the blog I listed below. Here are a few tips when working with students:
1. Use words like 'floor' 'walls' and 'ceiling' and reference constructing a house. This helps them to understand that the walls need to attach not only to the floor, but also to each other.
2. When cutting out the shapes and the cutting lines, have the students hold the template on the paper to get a precise cut otherwise the pieces won't attach correctly.
3. I had them start with 6 pieces and construct the 'floor' and the 5 'walls' first so they got the main idea of the construction. Then, when they got the hang of it, I gave them the last 6 pieces of paper.
4. This will take more than one class period to finish.
5. Good Luck!!
http://howaboutorange.blogspot.com/2011/11/how-to-make-3d-paper-ball-ornaments.html
Wednesday, November 30, 2011
Construction Paper Pine Trees
I am reposting this project from last year. If you are like me...you are swamped with demands for backdrops, hallway decor, holiday programs, and much more!!!! I do this project every year because I just LOVE the results and I know that you will too.
This project works great for grades 2-6. First of all, we discuss the shape of an evergreen tree in it's 2-D form (if we were drawing it). Then we discuss the 3-D form of a triangle...the cone. Next, I demonstrate how to make a cone out of green construction paper, make 'fringe' on the edges to resemble pine needles, and stack cones in various sizes to make the tree taller. Lastly, I make a mixture of white paint, glue, and water and let the kids splatter some snow and glitter on top of their trees.

This project works great for grades 2-6. First of all, we discuss the shape of an evergreen tree in it's 2-D form (if we were drawing it). Then we discuss the 3-D form of a triangle...the cone. Next, I demonstrate how to make a cone out of green construction paper, make 'fringe' on the edges to resemble pine needles, and stack cones in various sizes to make the tree taller. Lastly, I make a mixture of white paint, glue, and water and let the kids splatter some snow and glitter on top of their trees.

Thursday, October 6, 2011
Jean Dubuffet Sculputres
This is an exciting project that I am doing with my 6th graders. First, we watched this You Tube video showcasing some of Dubuffet's original drawings, paintings, and sculptures. I thought it was interesting to teach the kids that this particular artist based a lot of his own work on children's drawings. Next, I showed them a PowerPoint slideshow showing some abstract sculptures made of poster board and some of Dubuffet's resin sculptures.
We began our sculptures using white tagboard, cutting out free-form shapes, and adding pattern and color with black, red, and blue markers. I demonstrated how to attach the pieces together by making cuts in each piece and sliding one piece on another piece. Here are a few sculptures in progress (the first one is my teacher sample):


Here is the video from You Tube that I showed the students:
We began our sculptures using white tagboard, cutting out free-form shapes, and adding pattern and color with black, red, and blue markers. I demonstrated how to attach the pieces together by making cuts in each piece and sliding one piece on another piece. Here are a few sculptures in progress (the first one is my teacher sample):


Jasmin's Sculpture

Evan's Sculpture

Gabe's Sculpture

Curtis's Sculpture
Here is the video from You Tube that I showed the students:
Wednesday, May 4, 2011
Melted Record Bowls
Now, these are just the beginning of some great works of art, but I was just too anxious to post these :) I had melted these before school yesterday morning so my Art Club students could work on painting them and getting them ready for the Fine Arts Fair in two weeks.
First of all, to melt a record, you need to preheat your oven to 200 degrees, put the record on top of an oven proof glass bowl so when it heats up, it will slump over the bowl. As soon as you see the record melting, take it out of the oven and let it cool. At this point, you can carefully mold it into whatever shape you want to. You have to work quickly b/c as soon as it cools, it's permanently in that shape - unless you re-melt it, of course. It only takes about 5 minutes to melt and 2 minutes to cool, so it's a quick process. I put two bowls in my oven at a time, so within 30 minutes I had 18 bowls ready to be painted.
From experience, I can tell you that these will turn out beautifully if you spray paint them with a coat of white primer before using acrylics on them. Most of the acrylic paint won't show up well at all on a black surface, so to ensure vibrancy, I would recommend priming them first.


Thursday, April 28, 2011
Oaxacan Animals - Continued
We used acrylic paint for our animals today in art class. I like to introduce students to different types of paint, but acrylic is about as far as I go. I don't have the budget or the patience for oil paints at the elementary level. Acrylic was great for these animals because the paint dried fast and it dried with a nice shine. While our animals were made with the 'additive' sculpture method, I went ahead and introduced them to 'subtractive' sculpture by showing them photos of the sculptors making these wood animals starting with a tree stump and carved the animal out of a block of wood. I think it really helped them to understand why these sculptures are so important and why they are considered one of the most cherished art forms in the Latin American culture.
Here are a few finished animals:


Here are a few finished animals:

The infamous duck with his tongue hangin' out

The tiger was painted realistically, but the artist added details when the paint dried.

This tiger did not have the "folk art" details added, but the artist did such a good job, that I accepted her work just as it was.

This lion isn't finished yet, but I wanted to showcase the beautiful detail that the artist is adding to the body, mane, and legs.
I would also like to add that it is VERY difficult for even 4th graders to be able to control their paintbrushes to color a small sculpture in a smooth, even color and to add small details with paint! Each student got about 6 oz. of Model Magic and the animals measure about 3"x 4". So, that said, these are fabulous - if I do say so myself :)
I would also like to add that it is VERY difficult for even 4th graders to be able to control their paintbrushes to color a small sculpture in a smooth, even color and to add small details with paint! Each student got about 6 oz. of Model Magic and the animals measure about 3"x 4". So, that said, these are fabulous - if I do say so myself :)
Monday, April 25, 2011
Oaxacan Animals
I've been wanting to do a lesson on Oaxacan animals for the longest time, but kept putting-it-off for whatever reason. I was exploring some media on the world-wide-web when I came across this beautiful slideshow showing excellent examples of the woodcarvings and even some photos of the artists themselves. Here is the slideshow you can download from Slideshare:
Oaxacan wood carving slideshare ppt
View more presentations from ljohnson60
And here are some animals my 4th graders made using Model Magic (now keep in mind, these are just the beginning...we'll be adding color and details next class so stay tuned):


And here are some animals my 4th graders made using Model Magic (now keep in mind, these are just the beginning...we'll be adding color and details next class so stay tuned):

A duck with his tongue hangin' out

A cute pair of owls

Of course, a bunny.

And I love this droopy penguin.
Friday, March 4, 2011
Deep Blue Sea Mural - Day 3
The glue dried on our jellyfish and we were ready to add the tentacles with tissue paper and ribbon. The 6th graders did a great job with their creations! I like the color variety in the jellyfish.

 The 4th graders used construction paper to create some aquatic plants to glue down on our mural. Here are some students working hard:


Tuesday, March 1, 2011
Deep Blue Sea Mural - Day 2
I thought my 6th graders would enjoy creating some 3-D jellyfish for our underwater mural project. I actually got this idea from http://onecrayolashort.blogspot.com/. I always love to make paper mache projects with balloons! Well, let's just say, I love the results, but maybe not so much the actual "making" part of the project :) I allowed the students to use multi-colored tissue paper, to give a little contrast between each jellyfish. I think the pink jellyfish from One Crayola Short looked great, but I like to give students a choice of colors for their projects. These will be the tops of our jellyfish once they dry...


Third graders worked on creating schools of fish using styrofoam stamps. I instructed them to draw their own fish on their piece of styrofoam, cut it out, and use 1-2 colors of tempera paint to stamp their fish repeatedly on their paper.


Friday, February 11, 2011
Paper Mache Bowls
Well, the bowls turned out surprisingly well. Too bad I have to take half of the credit for them. Let's just say that if I had a 2 hour class, the students would have done 100% of the work. But, don't you find that sometimes it's just better to help them reach the final product than have a load of unfinished projects? Maybe if I would have saved this project for 6th graders, instead of 4th graders, I wouldn't have had to help them finish. The 4th graders spent a good 10 minutes getting over the oooey-gooey Art Paste instead of getting right to work.
I think that these bowls can be the foundation to add more cool and interesting things, like magazine paper, paint, Mod Podge, and the list goes on! I am thinking about spray painting mine silver :)


I think that these bowls can be the foundation to add more cool and interesting things, like magazine paper, paint, Mod Podge, and the list goes on! I am thinking about spray painting mine silver :)


Thursday, February 10, 2011
What was I thinking?
Sometimes I have these crazy ideas to utilize materials in new and different ways. For one, I have a collection of this Art Paste in the Art Room that has been here for the last decade, and since I'm one for using what I have rather than buying new...I introduce you to our latest Art Club endeavour.
It all started with a box of Art Paste:


I will add that I am spending my planning/lunch time today finishing up the balloons. Our 45 minute Art Club was not nearly enough time to cover the whole balloons with 2-3 layers of paper. I am actually only covering half of their balloons so that when they dry, they will be paper bowls. Look for more photos to come :)
It all started with a box of Art Paste:

...and some shredded paper...

...and some balloons...


And the result? A very messy Art Room, some soggy/half-covered balloons, and LOADS of fun...


I will add that I am spending my planning/lunch time today finishing up the balloons. Our 45 minute Art Club was not nearly enough time to cover the whole balloons with 2-3 layers of paper. I am actually only covering half of their balloons so that when they dry, they will be paper bowls. Look for more photos to come :)
Subscribe to:
Posts
(
Atom
)