Showing posts with label Recycled Art. Show all posts

Thursday, May 3, 2012

Wire Bird Sculptures

I found this lesson at Stuck in the Mud Pottery and really wanted to try it out with one of my classes.  Here is a link to her original lesson: http://stuckinthemudpottery.blogspot.com/search?q=soda+can

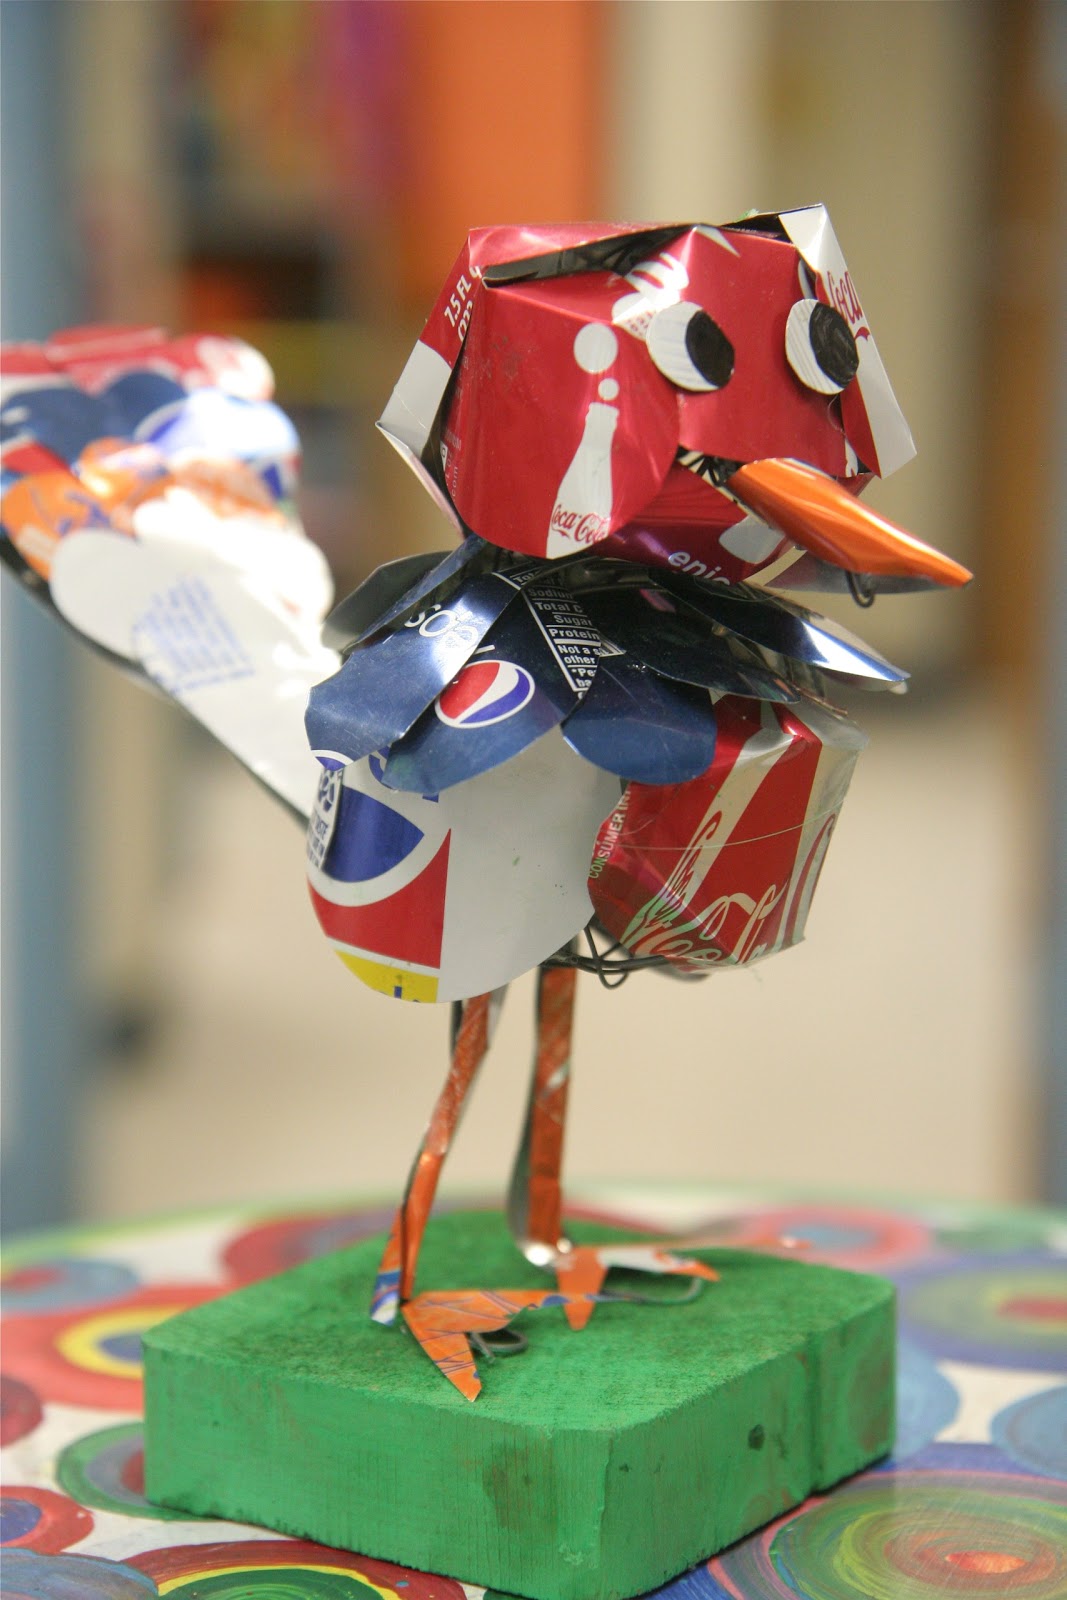
Here is my teacher sample:

And here are the wire bird sculptures before we had to chance to add the soda can feathers:

      I decided to tackle this project with my 5th grade students because they are a very creative group of kids.  I think they did really well with the form for their birds so far.  Basically, I told them to create a "yarn ball" with their wire; a large one for the body & a small one for the head.  Next, I showed them how to attach the head to the body, add legs, a tail, and a beak by bending the wire.  The legs attach best if you feed them through the body, having them actually attach to the top of the back.  This seems to give it more strength.  I have an endless supply of these cedar blocks, so I poked holes through the wood, added hot glue, and stuck the ends of the wire through the holes.

     Next class period, I will have the students finish the birds by adding colorful soda can feathers.  I had the aluminum pre-cut for the students so all they have to do is cut out some large tear-drop shapes for the feathers.  I found that some of the aluminum can simply be bent into shape without the use of hot glue.  However, most of the feathers and details will have to be added with a glue gun.  I have 2 in my classroom and I do the majority of the gluing and I use a good amount of discretion before letting the students use the hot glue gun by themselves. 

     I will post pictures next week of some finished pieces (hopefully). 

Wednesday, May 4, 2011

Melted Record Bowls

Now, these are just the beginning of some great works of art, but I was just too anxious to post these :)  I had melted these before school yesterday morning so my Art Club students could work on painting them and getting them ready for the Fine Arts Fair in two weeks.

First of all, to melt a record, you need to preheat your oven to 200 degrees, put the record on top of an oven proof glass bowl so when it heats up, it will slump over the bowl.  As soon as you see the record melting, take it out of the oven and let it cool.  At this point, you can carefully mold it into whatever shape you want to.  You have to work quickly b/c as soon as it cools, it's permanently in that shape - unless you re-melt it, of course.  It only takes about 5 minutes to melt and 2 minutes to cool, so it's a quick process.  I put two bowls in my oven at a time, so within 30 minutes I had 18 bowls ready to be painted.

From experience, I can tell you that these will turn out beautifully if you spray paint them with a coat of white primer before using acrylics on them.  Most of the acrylic paint won't show up well at all on a black surface, so to ensure vibrancy, I would recommend priming them first.


Friday, March 18, 2011

Ocean Mural Finished!

Finally, after 2+ hours of installation, the ocean mural is complete :)  The students are in awe as they walk through the front foyer of the school.  They all point out, "That's my shark, turtle, fish, etc." I first hung up the large 2-D paintings and then attached animal cut-outs with foam core dividers so some of the animals pop-out.  Next, I hung the jellyfish and soda bottle fish from the ceiling.  The last thing I plan on doing is putting up samples of student 'academic' work above the mural, because my theme was "Come SEA what we've been learning".


Monday, March 7, 2011

Recycled Magazine Flowers

I can use magazines in every season and for every occasion.  For this assignment, I had the students cut out colorful squares from magazine pages, fold them three times to get a small triangle, and cut a petal shape out of the top of the triangle.  We tried to find magazine pages that were contrasting in color, to make the layers really "pop".  Next, we rolled a whole page (preferably a green page) and glued it closed for the stem.  I had some jars that someone donated years ago that I thought would be the perfect place to showcase our boquets:

Friday, February 11, 2011

Paper Mache Bowls

Well, the bowls turned out surprisingly well.  Too bad I have to take half of the credit for them.  Let's just say that if I had a 2 hour class, the students would have done 100% of the work.  But, don't you find that sometimes it's just better to help them reach the final product than have a load of unfinished projects?  Maybe if I would have saved this project for 6th graders, instead of 4th graders, I wouldn't have had to help them finish.  The 4th graders spent a good 10 minutes getting over the oooey-gooey Art Paste instead of getting right to work. 

I think that these bowls can be the foundation to add more cool and interesting things, like magazine paper, paint, Mod Podge, and the list goes on!  I am thinking about spray painting mine silver :)


Wednesday, December 8, 2010

Magazine Christmas Trees

I am officially addicted to making Magazine Christmas trees!  I have had loads of magazine donations this year, thanks to my supportive staff members here at Halls Ferry.  Some magazines I can use with the kids and other magazines that I didn't know what to do with (like 50 copies of the November issue of Missouri Conservation???) and I am so glad I saved them for a project such as this. 
I can't take claim for this project, whatsoever!  I have to thank Martha Stewart and her video for my new addiction.  This project would work well with students because it's so easy to do.  Check out the video at http://www.marthastewart.com/article/magazine-christmas-trees


They can be painted gold like these...or left unpainted and sprinkled with glitter (which I'm going to do).  I'm making these for all the staff here at school for Christmas gifts, shhhh don't tell!