There's nothing I love more than winter art! It gives me the excuse to break out the sparkles!!!! We watched a YouTube video on Polar Bears and created these fun creatures using watercolors, glitter, & white paper. I walked them through each step and they turned out so cute! I can't wait to hang them up in the hallway. And since we live in the Midwest, we can probably keep these arctic paintings up until May!!!
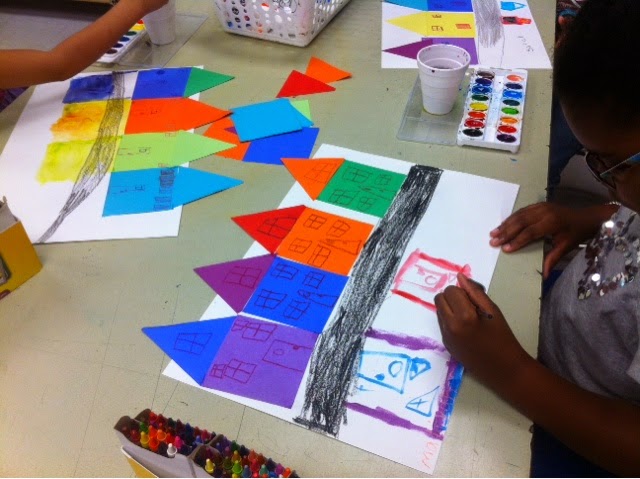
This was a fun but exhausting project with my 1st graders. We did Reflection Paintings today using construction paper houses and painting the reflection with watercolors. We should have started with a 1-media project for the 2nd week of school but that's not how I roll. I dive right in! Ha-ha! The kids did a great job, however. There were a few water cup spills and a few kids painting on each other, but all-in-all the paintings turned out great and will look FAB hanging up in the hallway!
Remember using kaleidoscopes as a kid? I LOVED them! This project was referred to me by a teacher here at school, and I love it. The kids were really interested and engaged throughout the entire class period. I had them trace circles with a sharpie because I wanted this to be a 1-day lesson. If you wanted to extend it, have them stamp circles using black paint and then when the paint dries, you can have them use watercolors to fill-in the areas. Another idea is to have the students experiment in color mixing where they paint the entire circle a solid color and then when it overlaps with another circle, they can see what new color is made by overlapping the colors. Of course I thought of this technique AFTER I finished the lesson, but good to know for next time! Good luck!
I cannot handle the level of cuteness in this project! First, we listened to a story about the tooth fairy on YouTube. In fact, this is a great tool to use on any project. You can find a read-aloud story for kids on just about any subject you are teaching and they are usually 5 minutes or less. This is a great way to introduce your topic and get the kids excited about the project. Ok, after the video, we drew the tooth fairy together, colored in her wings white and added white sparkle X's to the background, colored in her dress and body, and then used silver, white & blue liquid watercolors to paint over the entire paper. Lastly, the kids added glue to her wings and I sprinkled glitter on them for that magical fairy effect :-)
When they were finished, we wrote letters to the tooth fairy. You will LOVE reading these!
Welcome to the third week of school! I'm a little embarrassed that this is my first post of the new school year, but things have been so busy around here! I have been focusing on the all-time favorite children's author and illustrator Eric Carle this week. In fact, I have found some great You Tube videos showcasing his lively illustrations and storytelling! Most of the kids have heard this story before, but who can complain about hearing an Eric Carle story for the second time??? Not I! Here are some fantastic Mixed-Up Chameleons made by some fabulous 3rd graders:
These paintings made by my 5th graders turned out so beautiful! Using watercolors, we painted our skies first, focusing on using colors that we would find in a sunrise or sunset. Next, we painted the tree branch silhouettes with black tempera paint. This project lends itself to the discussion about how backlighting the subject creates outlines or shadows and loses detail. Painting tree branches is a great way to teach kids how much pressure they should put on the paintbrush for the desired result. We painted the large branches first, making sure we loaded our brushes with an ample amount of paint and pressed down on the bristles to make the thick lines. For the medium branches, we used less paint and focused on pressing down and lifting the brush up at the end to create a variation of thickness. Lastly, we worked on 'flicking' our brushes to create small, thin branches. For added detail, I gave the students Sharpies to add the very small, fine branches to their silhouettes. Here are two great examples:
This is a project I came up with for our annual Picture The Music Art Competition with the St. Louis Symphony Orchestra. Every year the Symphony requests artwork completed by elementary students in the St. Louis area to complete a work of art based on a selected piece of music. This year, our musical selection is Mussorgsky: Pictures at an Exhibition: The Great Gate of Kiev.
I begin the lesson by explaining how music and art can be related based on emotion and feeling. We talk about some of the most common feelings people associate with music...excitement, sadness, happiness, fear, and so on. Next, we talk about colors and some of the same feelings that people associate with certain colors...like "feeling blue", and so on. Next, I play the song selection and ask the students to think about some colors that they would use to represent the music.
For this project, we began by drawing a piano keyboard, adding music notes, and watercolors. I decided to use the image of a bird for this class to use in their artwork because birds are not only easy to draw, but they can easily be associated with music. Here are a few great finished works of art:
My FAVORITE lesson of all time!!!! I just adore salt painting. The texture, the unexpected element of surprise, the "how did you do that" from fellow teachers, the "WOW!" from my students. And, to top it all off, ALL of my students were enthralled with this lesson to the point that they gave their 100% effort (and we all know that doesn't happen with every lesson).
Of course, I went into the symbolic meaning of koi fish to the Japanese culture. We discussed where one could find koi fish in the STL area. Some have never seen them, while others have, etc.
Next, I showed them this video I found on You Tube which is a time lapse painting of a professional artist Lori Andrews (not as important as the process she goes through). While there are some words in the video geared toward the 'seasoned artist' I breezed through them explaining some different types of resists that artists can use while painting. I really liked the music in this video and the simple fact that it is geared for adults (which I told my students and I think that made them try even harder). Here's the video:
After drawing the fish swimming in different directions on our paper (to create movement and to add a sense of life to the work), we used white crayons to draw ripples in the water that will show up after we add the paint. I showed them how to paint a 4x4 area at a time so the paint will still be wet to add the salt. It takes awhile for the salt to totally dissolve, but after about 5-10 minutes the students start to see the interesting textural effect the salt leaves in the watercolor.
Oh yeah, I forgot to mention that I used my new liquid watercolors again - which I TOTALLY LOVE and highly recommend!
I have been seeing beautiful peacock artwork on teacher blogs and Pinterest a lot lately, so I hopped on the bandwagon and did a peacock lesson of my own. This was the first lesson that I tried out my new liquid watercolors and I have to say, I am quite impressed. We first drew the peacocks with Sharpies and painted the background using the liquid watercolors in cool colors. Next, I passed out cool colored oil pastels and instructed the students to draw the 'eyes' on the feathers right on top of the watercolor paint. The oil pastels I use are Portfolio, so if we had drawn the 'eyes' on the feathers before the paint, the oil pastels would have washed away since they are water soluble. Otherwise, traditional oil pastels would have worked fine before the paint was applied. Here are some samples of 3rd grade peacocks:
Today we worked on our art for the annual Picture The Music Art contest for the St. Louis Symphony Orchestra. We talked about how different kinds of music and evoke different emotions and how certain colors can match those emotions. (Deep, I know).
Then, I had the students pick three or four colors that they thought best matched Beethoven's 5th Symphony. They 'scribbled' the colors all over their paper and then I sprayed water on top of their paper so all of the colors would bleed together. This was the background for our paintings.
Next I gave the students a tray of tempera paint and gave them some specific things to paint. First, I told them to paint a wavy line, then a square, three circles, two straight lines, etc. I think they are fabulous and we had lots of fun creating these musical paintings :)
For this project, I must have been hopped up on caffeine to be able to complete it in the allotted hour time-frame. First of all, I had to set out oil pastels, watercolors, watercolor brushes, acrylic paint, acrylic brushes, and paper towels for each student...whew. But, the results are so stunning, I felt like it was well worth the extra effort on my part. Here were the steps:
1. Fold the paper to create the horizon. 2. Draw the clouds with the white oil pastel, the tree trunks with the brown oil pastel, and the water waves with the blue oil pastel. 3. Use watercolor paint to paint the sky and the water. 4. Use the acrylic paint to 'dab' the foliage on the trees. 5. Re-fold the paper to make the reflection in the water. 6. Use a slightly wet watercolor brush to make short horizontal brushstrokes in the reflection to make it look like water.
I worked while the students did so they could follow one step at a time and see how quickly they needed to work to move on to the next step. Here are some finished paintings:
I found this great online radio station called SKY fm radio this morning and had it playing all day while the kids worked on their art projects. Today most of my students have either been doing a repeat of lessons I've already posted or are finishing work from last week, so we needed some good background music to keep us inspired. I felt like I was at the spa all day long...nice way to end the week! And, here's my creation for the day:
We began our lesson on abstract art and Picasso's Portraits by reading this book by Dr. Seuss and discussing feelings and color emotions. This story could go with many different art projects, but since it talks about being all "mixed-up", I thought it would go with our Mixed-Up portraits. We drew our Picasso Portraits with oil-pastels, divided the paper with one vertical line and three horizontal lines, and used watercolor paint to fill each space in with color. I showed a PowerPoint presentation with a variety of Picasso's paintings while they were working so they could see his abstract portraits and how colorful they were.


