Showing posts with label Drawing. Show all posts

Friday, January 16, 2015

Kaleidoscope Drawings

     This was a great project that I basically invented for my annual Picture The Music unit. I generally try to come up with projects that are more abstract in subject matter and which experiment with different color techniques. I found an awesome video on You Tube showing an up close shot of a kaleidoscope set to some music. PERFECT! We folded our papers in half 3x to divide it into triangles. Next, I showed the students how to use simple shapes and lines in each triangle to create a design that is symmetrical. We used sharpie for the drawing and watercolor markers for the coloring. When they were finished, I sandwiched the drawing between 2 wet pieces of plain paper to get the colors to bleed together. I pressed them with heavy stacks of paper for a day. Then, these beautiful colorful drawings were revealed! And the bonus? I have a ton of colorful tie-dye paper that I can use with other projects! It's a win-win. 


Sunday, January 11, 2015

Miro Drawings

     Drawing to music in the style of Miro! This lesson went flawlessly. There's something magical that happens when you combine music with art. Before the lesson, I demonstrated how to draw lines and shapes which represent the music...large shapes when the music is loud, small soft lines and shapes when the music is soft. For this lesson I added in some 'silly people' like you would see in Miro's paintings. I feel like 1st graders would be able to relate to the silly, whimsical figures. To give the drawings a real 'painterly' effect, we painted water over the marker lines. To add color, we used crayons and watercolors for the background. I'll post a finished painting soon! 
Oh....before we began, I showed this AMAZING Eric Carle video on You Tube called I See A Song.  Where has this video been all my life (ok, a bit dramatic! Lol!).  


Wednesday, January 7, 2015

One Point Perspective

     This lesson on one point perspective went incredibly well yesterday with my 5th and 6th graders! I was shocked how quickly they picked up on the basic knowledge of using the vanishing point for every line they drew! I don't have any finished projects yet to share but here are a few pics of the beginning lesson. I began class by showing this You Tube video I found and the students were quite intrigued with it. So, I think it heightened their interest in the drawing lesson itself. Otherwise they may not have been so excited about the project...who knows! It's hard to get adolescents excited about art sometimes. We plan on adding some really cool colorful designs to the sky next week. I'll keep you posted! 


Monday, October 13, 2014

Pumpkin Patch


Love, love, LOVE this little video about pumpkins!!!  I used it last year with my October lessons and couldn't WAIT to use it again!  It's just darling!  For my kinders, I decided to go with a simple lesson on landscapes and horizon lines.  We drew the ground and the sky and kept it pretty simple.  Next, I put 4" orange squares on their tables and had them draw and cut out pumpkins for their pumpkin patch.  They did a great job and this lesson goes to show that you don't have to have something over-the-top and extravagant to engage your students.  Sometimes simple is best.


Monday, September 8, 2014

Chalk Self-Portraits

What a fun way to make self-portraits!!!! I was skeptical at first using the chalk pastels with my 2nd graders because we all know that chalk pastels can go from beautiful to disaster in no time! However, the students did SO well listening and following directions and their artwork shows it! For this drawing you have to think backwards a little bit. For example we first drew the head and then the eyes and then colored everything but the eyes. Then we drew the neck, colored it, and drew the shirt and colored that. Then, we added facial features with black chalk and added the hair and then colored the background. These look fabulous hanging in the hallway! I may have fumed myself out of the art room for the afternoon because I sprayed them with Fixative so they wouldn't smear. The things we do for art!!!! Sheesh.


Thursday, October 24, 2013

Colored Pencil Drawings

This is a great lesson on using a value scale.  First, we put a dot in the center of our paper and used a ruler to draw straight lines all around the paper.  Next, we used colored pencils to add color to our drawings.  Before we began, we practiced using the same color with different values on a scrap piece of paper.  Students are always amazed at the different variations of value they can get using just one colored pencil!  This project took about two weeks to finish.  Here are a few samples:


Friday, September 27, 2013

Pencils!

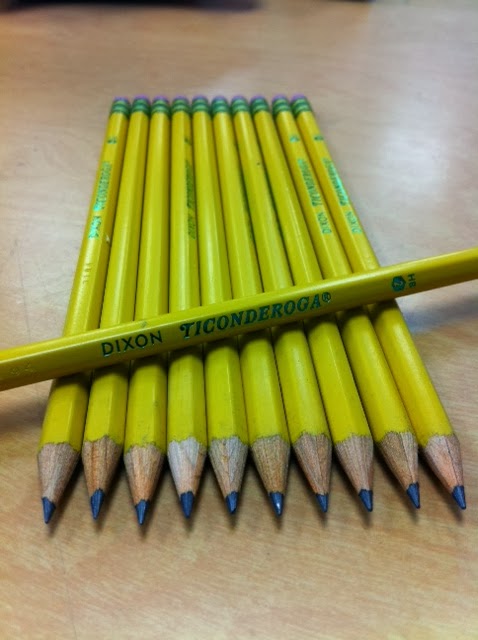
     As an art teacher, you know that pencils are the lifeline of most art projects.  There is nothing worse than having to stop your drawing project for student after student to get up and go sharpen his/her pencil.  And as you know, once that ONE person's pencil needs sharpened, so does everyone else's pencil!  It's an epidemic in an Art room...breaking pencils are contagious (just like restroom breaks)!  Well let me tell you, I've decided enough is enough.  I have had it with cheap pencils.  I have had it with sharpening pencils, handing them out, and finding the lead falls right out of the pencil.  Does this image look familiar to you???


     Well, I have great news!  If you would like to put a stop to the pencil epidemic in your art room, you NEED to invest in some Ticonderoga pencils by Dixon!  These pencils are AMAZING!  I have found the lead lasts longer, sharpening time has decreased, the lead lasts FOREVER without needing to be sharpened, and when I do have to sharpen them, the pencil sharpener does not eat them up (you know what I'm talking about!).  So, the question to ask yourself is this...does the brand of pencil really matter???  And I'm telling you YES, it does!  Stock up on great pencils and your drawing classes will be forever changed :-)


Monday, September 16, 2013

Glue-Line Relief Pumpkins

     This is my fall go-to lesson that I have been using every year.  Typically I don't repeat lessons year after year because as an artist, I'm always looking for something new and fresh to use in my classroom.  However, I just LOVE how these drawings turn out and they look FABULOUS on the walls for a little fall decor.
     4th graders learned about depth perception and overlapping while creating these spooky pumpkins.  I like the effect of chalk on dark paper, so we started with a black sheet of paper.  The students drew the first pumpkin with a pencil right in the middle.  Next, they drew the two side pumpkins a little bit smaller and behind the first one to show depth and overlapping.  They traced over the pencil lines with a line of glue and waited a week for the glue to dry.  The next class, they colored inside the spaces with chalk pastels (VERY messy, btw) and cleaned up their drawing by wiping off the glue relief line, which is now a black line.  Here are a few completed works of art:

Mary Jane's Pumpkins

Grace's Pumpkins
Devan's Pumpkins

Thursday, January 24, 2013

James Rizzi City Drawings

     This was a marathon project for my 4th & 5th graders!  We have spent the past 3 WEEKS working on our drawings.  The first week, we watched a You Tube video about James Rizzi and discussed his fun, whimsical paintings.  Students began by sketching out their cityscapes, making sure to create depth and dimension by including a foreground, a middleground, and a background.  Since James Rizzi was from New York and his paintings were based on his city, we decided to make our drawings based on our great city of St. Louis!
     The second week, students traced over their pencil drawings with a sharpie marker and finished up adding details such as people, cars, trees, windows, etc.  They also started using the markers to add color during the second week.  Most of my students were so enthralled with their precise coloring that they spent a LONG time on this particular task.
     The third week, students finally...yes, finally finished their drawings.  (Now, don't get me wrong...there were some students that STILL have not finished this project.  They fall into two categories: 1.  they lost interest in this project 1/2 way into week #2 and could not finish, or 2. they were soooo incredibly focused that they need more time because of all of the details they added and they were trying to make it 'perfect').
Here are some stellar works of art inspired by James Rizzi:

Josiah's city 
(He's not finished yet with his, but I love the billboard! Don't you?)

Victor's city 
(he's not quite finished yet...but this is FABULOUS!)

Katelyn's city 

 Brandon's city

George's city 

Jordan's city

Wednesday, October 17, 2012

Wow City!!

      I found this book on Pinterest and asked my librarian to track it down for me.  I like it because it is visually stimulating.  The author is actually an illustrator who decided to write a book after he took his 2-year old daughter to the city for the first time.


      I used this book with my K-3 classes but changed the medium according to grade level.  For example, these are examples of glue-line relief drawings using chalk pastels.  K&1 classes used Crayola oil pastels to add color to their drawings.  The first class, we drew the city using the concept of overlapping buildings.  I showed them how to draw buildings in the foreground and add buildings that look like they are behind the other buildings.  Some little ones got this, and some didn't.  It is a more advanced thinking skill for little artists, but I figure I may as well introduce the concept early so they might remember it when they are ready to manipulate the skill.  Here are some stellar examples:

By Krystal

By Rachel


Friday, August 31, 2012

Kaleidoscope Name Drawings

I found this lesson on Pinterest several weeks ago and thought it would be a great back-to-school lesson to help me get to know ALL of my students' names.  Here is a link to the original lesson: http://www.teachkidsart.net/kaleidoscope-name-design/

I modified it a bit by doing the letters in cursive to make it a bit less geometric.  I did, however, use the basic block lettering for my 4th graders since they are not quite ready for cursive text.  Here are some photos that I took using my iPhone (forgive the quality...I'll try to remember my 'real' camera soon.)

 This is a finished product.  See...it says Mrs. Keller!

Here's one in the beginning stage.  The steps are:
1.  Divide a square into 8 equal triangles by folding the paper.
2.  Take a separate triangle and write the name from the top to the bottom.
3.  Turn the name 'lines' into name 'shapes' by going around the outside of
the letters and the inside of the letters.
4.  Trace over the name letters with a Sharpie on the front & the back
of the triangle.
5.  Place the triangle into one of folded triangles on the paper.  Make sure
it fits perfectly.  Now, put the triangle under the paper and trace the black
lines you now see through the paper.
6.  Now, FLIP the triangle to get a mirror image in the next space.  Place the
triangle under the paper and repeat these steps 8 times.
Enjoy! 

Wednesday, March 28, 2012

Rotational Symmetry

I am pulling out an old lesson this week for my 4th graders who happen to be working on Rotational Symmetry.  I love teaching this lesson because the results are stunning, the kids feel confident about their work, and they want to work hard for the final product (which is sometimes a challenge).  I have the students create a simple drawing on 1/8 of their circle, then teach them how to "transfer" their drawing into all 8 parts of their circle by putting pencil led on the back of the piece of paper and tracing over the original drawing 8 times.  We also discuss some techniques of using colored pencils, like graduated coloring, shading, and blending colors together.


Step 1: Divide circle, Draw design onto separate 1/8th
  
Step 2: Fill backside of design piece with pencil lead


Step 3: Trace over design into each piece on the circle, 
pressing hard to transfer the lead from the back onto the paper.

Step 4: Trace over all pencil lines with a Sharpie & add color!


Wednesday, February 29, 2012

Pattern Zebras


This was a fun lesson that I did with my Kinders yesterday.  First, I pulled-up this short story on You Tube about Zippy the Zebra and symbiotic relationships (yes, of course I planned a science lesson to go along with this...or maybe it was a happy coincidence). 


Then, I had pre-cut large ovals, small ovals, ears, and legs for the bodies.  If the classes were older, I would have them cut their own shapes.  I showed them the order to glue the shapes down & then demonstrated how to create a pattern in the body, legs, & head using markers.  Lastly, we glued yarn on the head, back, & the tail.